Hey everyone, I hope you’re having an amazing day today. Today, I’m gonna show you how to prepare a distinctive dish, decorated sushi cake. One of my favorites. This time, I am going to make it a little bit unique. This is gonna smell and look delicious.
Decorated Sushi Cake is one of the most well liked of current trending meals on earth. It’s enjoyed by millions daily. It is simple, it’s fast, it tastes delicious. Decorated Sushi Cake is something that I have loved my entire life. They are fine and they look wonderful.
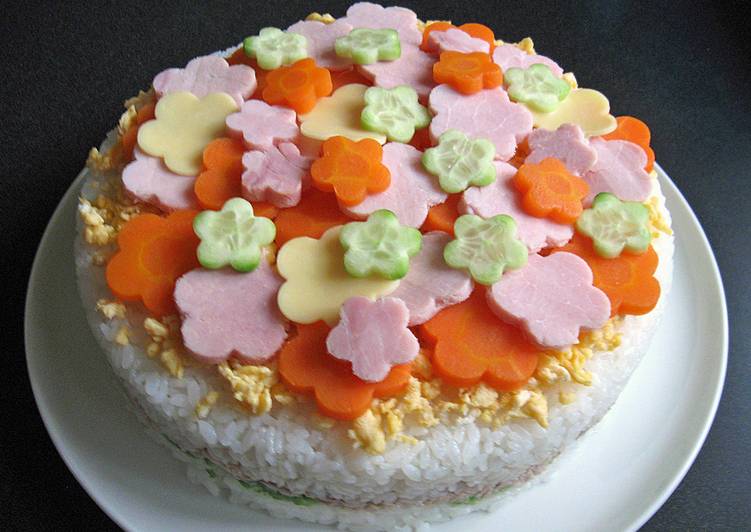
This cake is ideal for anyone who loves a california roll! The cake is wrapped in fondant and then decorated with with sprinkles and fondant to look like the real thing. I made this Sushi Cake for my friend's birthday.
To begin with this particular recipe, we have to first prepare a few ingredients. You can cook decorated sushi cake using 16 ingredients and 7 steps. Here is how you cook it.
The ingredients needed to make Decorated Sushi Cake:
- Prepare <Sushi Rice>
- Take 3 cups (180 ml) cup) Japanese Short Grain Rice
- Get 75 ml Rice Vinegar
- Get 4 tablespoons Sugar
- Make ready 1 & 1/4 teaspoons Salt
- Take <Filling>
- Prepare Canned Tuna (185g can) & Japanese Mayonnaise
- Make ready 1/2 Avocado *sliced
- Get *Other Suggestions: Chicken Soboro (find my recipe), Salmon Flakes, Scrambled Egg, Teriyaki Chicken, etc
- Get <Topping>
- Take 3 Eggs *finely scrambled
- Prepare Sliced of Ham
- Get Carrot *sliced and blanched in salted water
- Prepare Cucumber
- Get Sliced Cheese
- Prepare *Other Suggestions: Smoked Salmon (formed into Rose flowers), Thin Omelet (thinly cut into noodles), Cooked Prawns, Snow Peas, Sugar Snap Pea, Asparagus, Broccolini, Cucumber, etc
Decorating This Sushi Cake: Stack and frost cake layers on a greaseproof cake board, using a dab of white frosting to help stick the first cake layer to the board. Add an even layer of the uncolored white. We call them "Sushi Cakes" these days, but originally they were called "Oshi-sushi." You may think it's difficult to make, but actually it's quite easy! Just use a cake pan or any other deep dish, place.
Steps to make Decorated Sushi Cake:
- When you cook Rice for sushi, cook with slightly less amount of water to achieve firmer texture. Basically you need same volume of rice and water. If you are using Rice Cooker, set the water level slightly lower than the mark. *Note: Wash rice well before cooking.
- Make Sushi Vinegar by mixing the ingredients together.
- Pour the Sushi Vinegar over the HOT rice, then empty it into a large mixing bowl. Mix it well gently and thoroughly, fanning the rice with a fan or piece of cardboard to help the rice cool quickly. Cover the rice with a damp cloth to stop the rice drying out.
- While Rice is cooking and cooling down, prepare other ingredients for Topping and Filling.
- Line a round cake tin (I used 21cm tin) with plastic food wrap. Fill it with 1/2 Sushi Rice evenly and press down. Arrange Filling ingredients on the rice, cover with remaining 1/2 Sushi Rice, and press down.
- Place a serving plate on the tin, and flip it over to transfer the Sushi Cake onto the plate. Remove the food wrap.
- Decorate it with Topping ingredients. Children are very creative and they will enjoy decorating the cake.
These Sushi Cakes by Yolanda Gampp of How To Cake It are easy to follow and delicious. Chocolate jelly roll sponge cake combines with ginger infused buttercream before getting topped with realistic. This cake is ideal for anyone who loves a california roll! Introducing this awesome homemade sushi cake recipe, really easy and fun to make. This homemade sushi cake is incredible from so many aspects.
So that is going to wrap it up for this exceptional food decorated sushi cake recipe. Thank you very much for your time. I am sure you can make this at home. There is gonna be more interesting food at home recipes coming up. Remember to bookmark this page in your browser, and share it to your loved ones, friends and colleague. Thanks again for reading. Go on get cooking!